Auto-Label Policies in Microsoft Purview Records Management Part 1: How to Use KQL
This is Part 1 in our series of auto-labeling policies in Microsoft Purview Records Management with an introduction of using Keyword Query Language (KQL).
Having the tools to automate records retention can ease the challenges of managing digital records and organizational compliance. However, configuring a tool like Microsoft Purview Records Management can be less-than-easy, particularly if you wish to leverage features like custom column metadata to auto-classify the records in your solution.
This blog post will walk you through some common and complex auto-labelling queries to try in your Microsoft 365 (M365) Records Management implementation — from referencing custom columns to setting compound conditions.
Auto-Label Policies and Keyword Query Language (KQL)
When creating an auto-label policy in Microsoft Purview Records Management, there are 3 options for determining what type of content will get labelled:
Content containing sensitive information
Content containing specific words, phrases, or properties
Content matching a trainable classifier
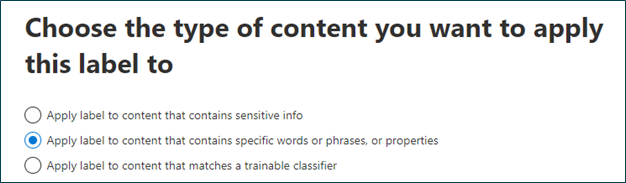
Choose content label type in Microsoft Purview Records Management
In most cases, your configuration will require option 2: a query written in Keyword Query Language (KQL) that assesses which content will be labelled.

Text box where you configure a KQL query for automatically applying a label
If this next step of policy creation looks intimidating: you are not alone! Read on for solutions that transform this blank slate into the classification engine you need.
But first, let’s build our foundational knowledge with an overview of Keyword Query Language and how to use it for searching SharePoint custom columns.
Most of time for auto-applied policies, you will need to configure a query with Keyword Query Language (KQL).
Introduction to Keyword Query Language (KQL)
Keyword Query Language (KQL) allows users to conduct advanced searches on SharePoint sites and content: both through SharePoint’s user interface and through the Microsoft Purview Compliance Portal.
When using KQL for simple content searches, queries require the format property:value, where “property” can be any searchable document or site property, and where “value” represents the specific property or column value of the records you wish to retrieve.
Using KQL syntax, users can retrieve results based on the content conditions such as:
When (or how long ago) the document was last modified
What content type an item has
In what list or library a file exists
Users can also search multiple properties at once as part of a single KQL query by leveraging all-caps Boolean operators, such as AND, OR, NOT, and (). This is useful for retrieving content by more than one property value, such as for all content where the content type is “approval,” but only where the file is also a pdf.
Tip: Use all-caps operators such as AND, OR, NOT and () to search over multiple properties.
KQL examples
KQL queries using default properties
Scenario Description |
Query |
|
Retrieve content with the content type of contract |
contenttype:contract |
|
Retrieve content last modified January 1, 2022, or later |
lastmodifiedtime>=2022-01-01
|
|
Retrieve content created before last month |
created<”last month” |
|
Retrieve all pdfs with the content type of “approval document” |
contenttype:”approval document” AND fileextension:pdf
|
|
Return any content where the content type is either “invoice” or “purchasing document,” but only where those documents were last modified before today |
contenttype:(invoice OR “purchasing document”) AND lastmodifiedtime<today
|
Using KQL with custom columns
By default, custom columns are not searchable using KQL in SharePoint or the Purview Compliance Portal. Thankfully, it can still be done.
To query custom columns as part of an auto-label query in Purview, a SharePoint Administrator must first map the column’s crawled property to an unused refinable managed property in the SharePoint admin center search schema. Reindexing will take some time before searching the refinable property will yield results.
Only a fraction of the tenant’s refinable managed properties can be used with Purview auto-label policies, so plan and map your custom columns accordingly:
Managed Property Type |
Managed Property Range |
|
Date |
RefinableDate00 – RefinableDate19 |
|
Whole number integers |
RefinableInt00 – RefinableInt49 |
|
Strings: Text, Person or Group, Managed Metadata, Choice, and Yes/No |
RefinableString00 – RefinableString99 |
Case Examples: Using KQL to Auto-label Retention Labels
Here are a few basic case examples of using KQL to auto-label retention labels:
Classify Based on Content Type
When a single site has many purpose-built documents libraries that each have different content types associated with them (as we recommend at Gravity Union), querying the content type can be an effective way to apply many different retention labels across a single site location.
Examples of Content Type Queries:
Scenario Description |
Query |
|
Apply label to all content with the “competition document” content type. |
Contenttype:”competition document” |
|
Apply label to all content with either the “competition document” or “competition tracking item” content types. |
Contenttype:(“competition document” OR “competition tracking item”) |
Classify Based on Path
In rarer cases, you may have multiple document libraries with the same content type in a site, but with each library having different retention needs. By using a path query, you can apply retention labels based on the document’s library or list location in a site, rather than its content type.
Copy the library URL from your browser’s address bar, and trim the end of the URL so that it follows this general format:
https://[yourorganizationname].sharepoint.com/sites/[sitename]/[libraryorlistname]/
Add a wildcard character (*) at the end of the path to also label document set and folder content:
https://[yourorganizationname].sharepoint.com/sites/[sitename]/[libraryorlistname]/*
Examples of Path-Based Queries
Scenario Description |
Query |
|
Apply label to all content in the Recruitment site’s “Competition Files” library. |
path:”https://[yourorganization].sharepoint.com/sites/Recruitment/CompetitionFiles/*” |
|
Apply label to all content in the Recruitment site’s “Competition Files” library and “Recruitment Tracking” list. |
path:(“https://company.sharepoint.com/sites/Recruitment/CompetitionFiles/*” OR “https://company.sharepoint.com/sites/Recruitment/RecruitmentTracking/*”) |
Path-based queries are a solution, but they are not the strongest solution for long-term management. If users ever change the name of a SharePoint library, your policy will cease labelling until you amend the query. For this reason (and more), classifying records based on content type should be your core strategy.
What’s next
Check out Part 2 of this series on designing auto-label policies in Microsoft Purview to learn about setting up advanced scenarios using KQL.