Teams or SharePoint site sprawl? How to rein it in
How sprawl starts
When you first enable Microsoft 365 apps such as Teams and SharePoint, anyone can create new teams, sites or groups.
Is this a good thing?
For many organizations, it starts out ok. People are creating sites as they need them for projects, departments, business functions, etc. People are sharing documents to groups, having conversations in Teams instead of cluttering up email, and posting social updates to appropriate channels.
Collaboration and sharing are working!
Microsoft recommends a policy where anyone can create teams, sites and groups because it allows users to start collaborating without requiring assistance from IT.
However, as you use more of Microsoft 365 (M365), your organization can end up with sites or groups that you don’t even know are there. For example:
When you create a new Team ➡️ a new SharePoint site and group are created.
When you create a group in Outlook ➡️a new group with a new SharePoint site is created.
When you create a shared channel in Teams ➡️a new SharePoint site is created.
When you create a new plan in Microsoft Planner (not connected to a group) ➡️ a new group and a new SharePoint site are created
It goes on and on and on.
Here’s an overview of what services are provisioned depending on where a M365 group is created:
Services provisioned with a Microsoft 365 group. Image source: Microsoft
Sprawl is almost unavoidable since Microsoft has underpinned many features with a required group, a required SharePoint site, or both.
The issues
Over time, without governance, a steady growth of SharePoint sites, Teams, and Microsoft 365 groups creates information management headaches such as:
Information overload with a long list of Teams or sites that people have to navigate
Similar teams or groups that probably need merging or alignment
Inactive teams or groups that don’t get cleaned up
Closed or completed projects with sites that don’t get archived
Accidently created sites or groups that need to be deleted
We covered a few ways to clean up a Microsoft Teams sprawl in a past post on this blog. The advice included:
How to do a Teams Audit
Confirm Teams owners and policy
Add Team expiry dates
Collapse Teams into channels
In a continuation to that post, here are 3 more tips to help clean up or prevent sprawl:
Restrict provisioning through permissions
Implement a provisioning process
Set expiry, archive and retention policies
This advice applies whether you starting out on your Microsoft 365 journey, or you need to clean up sprawl after it happens.
1. Restrict provisioning through permissions
To slow down the sprawl — even for the short-term as a stop-gap measure — you can disable Microsoft 365 group creation for end users and have select people create groups. This will stop the self-service creation of new groups.
There are 3 steps to set this up:
Create a group to manage the users or sub-groups who are allowed to create M365 Groups
Run a PowerShell script
Test that it works
Microsoft provides the detailed instructions here: Manage who can create Microsoft 365 Groups | Microsoft Learn
Note: Restricting only SharePoint site creation means that users will still have the ability to create M365 groups or resources. However, this is an option if you’re just focused on sites.
This only gets you halfway to a solution however.
Long-term you must decide on a process for creation.
Will you keep limiting new group creation so users have to request new sites and teams from IT?
Or will you open it back up by creating a group for ‘approved creators’? Maybe these are trusted site or department champions who understand your provisioning policies and have had some training.
A long-term solution requires governance planning to make sure collaboration is working well for the organization. Ultimately, the success of governance planning depends on how well you communicate expectations to staff and owners of groups / sites. Consider the following communication methods:
Reinforce governance with training. Build on Microsoft 365 learning pathways and Viva Learning to ensure that your organization-specific expectations are reinforced with Microsoft-provided training.
Deliver governance as a site, not a document. Create an organization-specific Adoption Center in a SharePoint site that is part of your organization’s intranet to help M365 group owners, Teams owners, and SharePoint site owners understand not just "how to" but also "how should." Create topic-specific pages that address different scenarios such owning project sites vs. business function sites.
2. Implement a provisioning process
A provisioning process can help slow down the creation of sites and groups, as well as manage the naming, sensitivity and retention of information.
In its most basic form a provisioning process can be a form and workflow to streamline approvals.
A few things to consider when designing the process:
How much information do you require for a request?
Do you need to validate the incoming info or are new requests automatically approved?
What is the complexity of your approval process? E.g. is there one approver, many approvers, and is it a simple approve / reject action or more complicated?
What is the desired outcome after the request? i.e. is someone manually provisioning the site / group, is it automated, or does your team check the validity later?
We have built forms and a request process with the Power Platform including a Power App to manage requests and Power Automate workflows to manage the provisioning process.
There are also tools that can help you get started with a process:
Option 1: An open-source (and unsupported) option such as ProvisionAssist on GitHub
Option 2: A third-party product such as Orchestry or ShareGate’s governance product for Teams lifecycle management.
There are other options too, but these are the main products we’ve had experience with.
3. Set archive, expiry and retention policies
Finally, a proactive strategy to managing sprawl involves setting up archive, expiry and retention policies.
These policies help manage the lifecycle of information and makes the list of active Teams, groups and sites more relevant for users.
Archiving
There’s a simple Archive Team function in Microsoft Teams that will ‘freeze’ the Team and has the option to make the SharePoint site read only.
It’s accessed from the Manage Teams option in the top left and then you select the team > Archive Team:
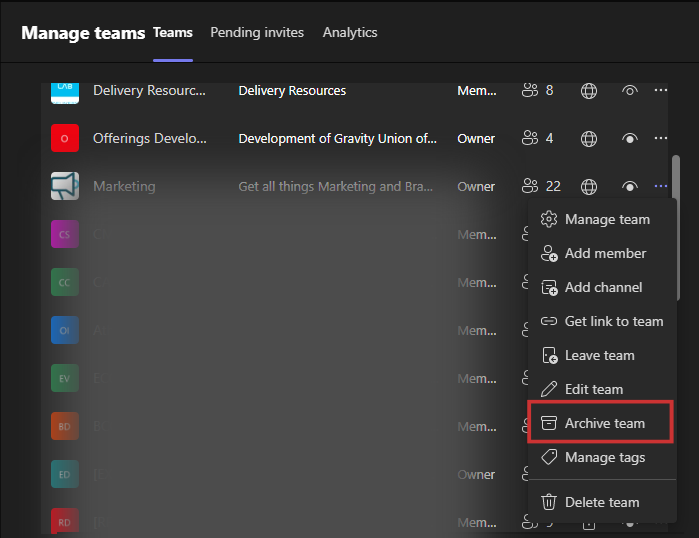
Archive feature on a Microsoft Team
Keep in mind that it doesn’t automatically archive Teams after a period of inactivity. It’s also still possible to add or remove members from the team, and past activity such as conversations remains available.
Archiving is a good option to educate Team owners on for specific types of Teams such as projects where they can archive the Team at project close out.
Archiving can also be used regularly by admins – say twice a year – to manually clean up old Teams.
For automation and better retention options consider enabling a retention policy or label (more on that below).
Expiry
To reduce the number of unused Teams, you can setup an expiry policy for Microsoft 365 Groups in Microsoft Entra ID.
When a group expires, the group and it’s associated content in Teams, SharePoint, Planner, etc. are "soft-deleted" and can be recovered for up to 30 days.
Team owners get notifications for renewing the team 30 days, 15 days and 1 day before expiry. They can click Renew Now in Teams to keep the team active:

Renewing a Microsoft Team
Groups that are actively in use are renewed automatically around 35 days before the group expires. In this case, the owner doesn't get any renewal notifications. These actions automatically renew a group:
SharePoint: View, edit, download, move, share, or upload files. Note that viewing a SharePoint page doesn't count as an action for automatic renewal.
Outlook: Join or edit group, read or write group message from the group, and like a message
Teams: Visit a teams channel.
Viva Engage: View a post within a Viva Engage community or an interactive email in Outlook.
Forms: View, create, or edit forms, or submit a response to a form.
Get the detailed steps for configuring the expiry policy for Microsoft 365 Groups on Microsoft Learn.
Retention labels and policies
Setting retention on M365 groups, SharePoint sites and Teams is a COMPLEX topic, but we’ll get you started with a couple of key points.
The first choice with retention is to decide on your goals for retention. For example, your goal might be:
Keep content that is relatively active (say edited in the last 5 years) and delete the rest
Quickly clean up the old content in Teams and SharePoint and prevent it from accumulating
Retain some content as records for legal and compliance reasons E.g. you have special requirements for retaining project content, or content owned by executives
Review content before it’s deleted/disposed and you need a log of that
Enable a records management team to manage retention and disposition
The differences between retention policies and retention labels
Once you have your key goals defined, it’s important to pick the right settings for retention in Microsoft Purview. There are two fundamental approaches which can be used separately or mixed and matched together:
Retention policy: Use a retention policy to assign the same retention settings for content at a site or mailbox/group level
Retention label: Use a retention label to assign retention settings at an item level (library, document, email)
For example, if all documents in a SharePoint site need to be retained for 7 years, it’s easier to do this with a retention policy. However, if some documents such as invoices need to be retained for 10 years and other documents such as the OneNote notebook and collaboration files can be retained for 5 years, then you need a retention label.
A simple starting point
A retention policy is a simple way to start if you’re looking for a simple method to retain, or delete or retain-then-delete content.
When you first setup a retention policy, you choose the location(s) where you want retention to apply. These are the main choices:
Exchange mailboxes and public folders
SharePoint sites or SharePoint classic and communication sites
OneDrive accounts
Microsoft 365 Group mailboxes & sites
Teams channel messages
Teams chats and Copilot interactions
Viva Engage locations
Note: Although you can select multiple locations for a single retention policy, you can’t have one-policy-to-rule-them-all because some locations are automatically excluded when you select Teams/Viva Engage.
From there, you choose whether you want an adaptive or static policy, and specify the configuration options for retaining and deleting content. Review the detailed steps from Microsoft which explains the retention policy settings for different locations.
Retention labels are a better long-term strategy
Generally, for most of our projects we’re using retention labels because they have more functionality such as:
Retention labels stay with the content even if it’s moved
Default labels can be applied to SharePoint content
Actions are supported at the end of the retention period such as a disposition review
Start the retention period when an event occurs such as an expiry date
However, it takes a little more planning and figuring out content types and information architecture to make retention labels work well.
If you need more help deciding on using retention policies vs. labels please review the Microsoft compliance documentation on Retention policies and retention labels or reach out and we can help.
Summary
If you are starting out in the early days of Microsoft 365, it’s best to take a proactive approach so you avoid some of the issues of information sprawl. This means planning out governance, deciding who can create teams and sites, setting expiration policies, archiving and retention options.
Because organizations have different needs, there are many options in Microsoft Purview and Microsoft 365 to reduce information sprawl. Reach out for help understanding the pros and cons of the options and we can help craft the right approach for your organization.