Purview Sensitivity Labels: Rollout Tips & Considerations
Preview
In this article, we build on our previous post, A Blueprint for Microsoft Purview Sensitivity Labels and cover:
Practical rollout strategies to move from pilot to organization-wide adoption
A phased rollout model from manual labeling to auto-labeling and inheritance
Common pitfalls to avoid when scaling labels too quickly
We shared a simple “starter kit” of sensitivity labels in a previous post.
Naturally, the next question would be: what’s the best way to rollout sensitivity labels to all staff? In this article we explore organization rollout tips and ideas for end-user training and education.
Rollout strategies for sensitivity labels
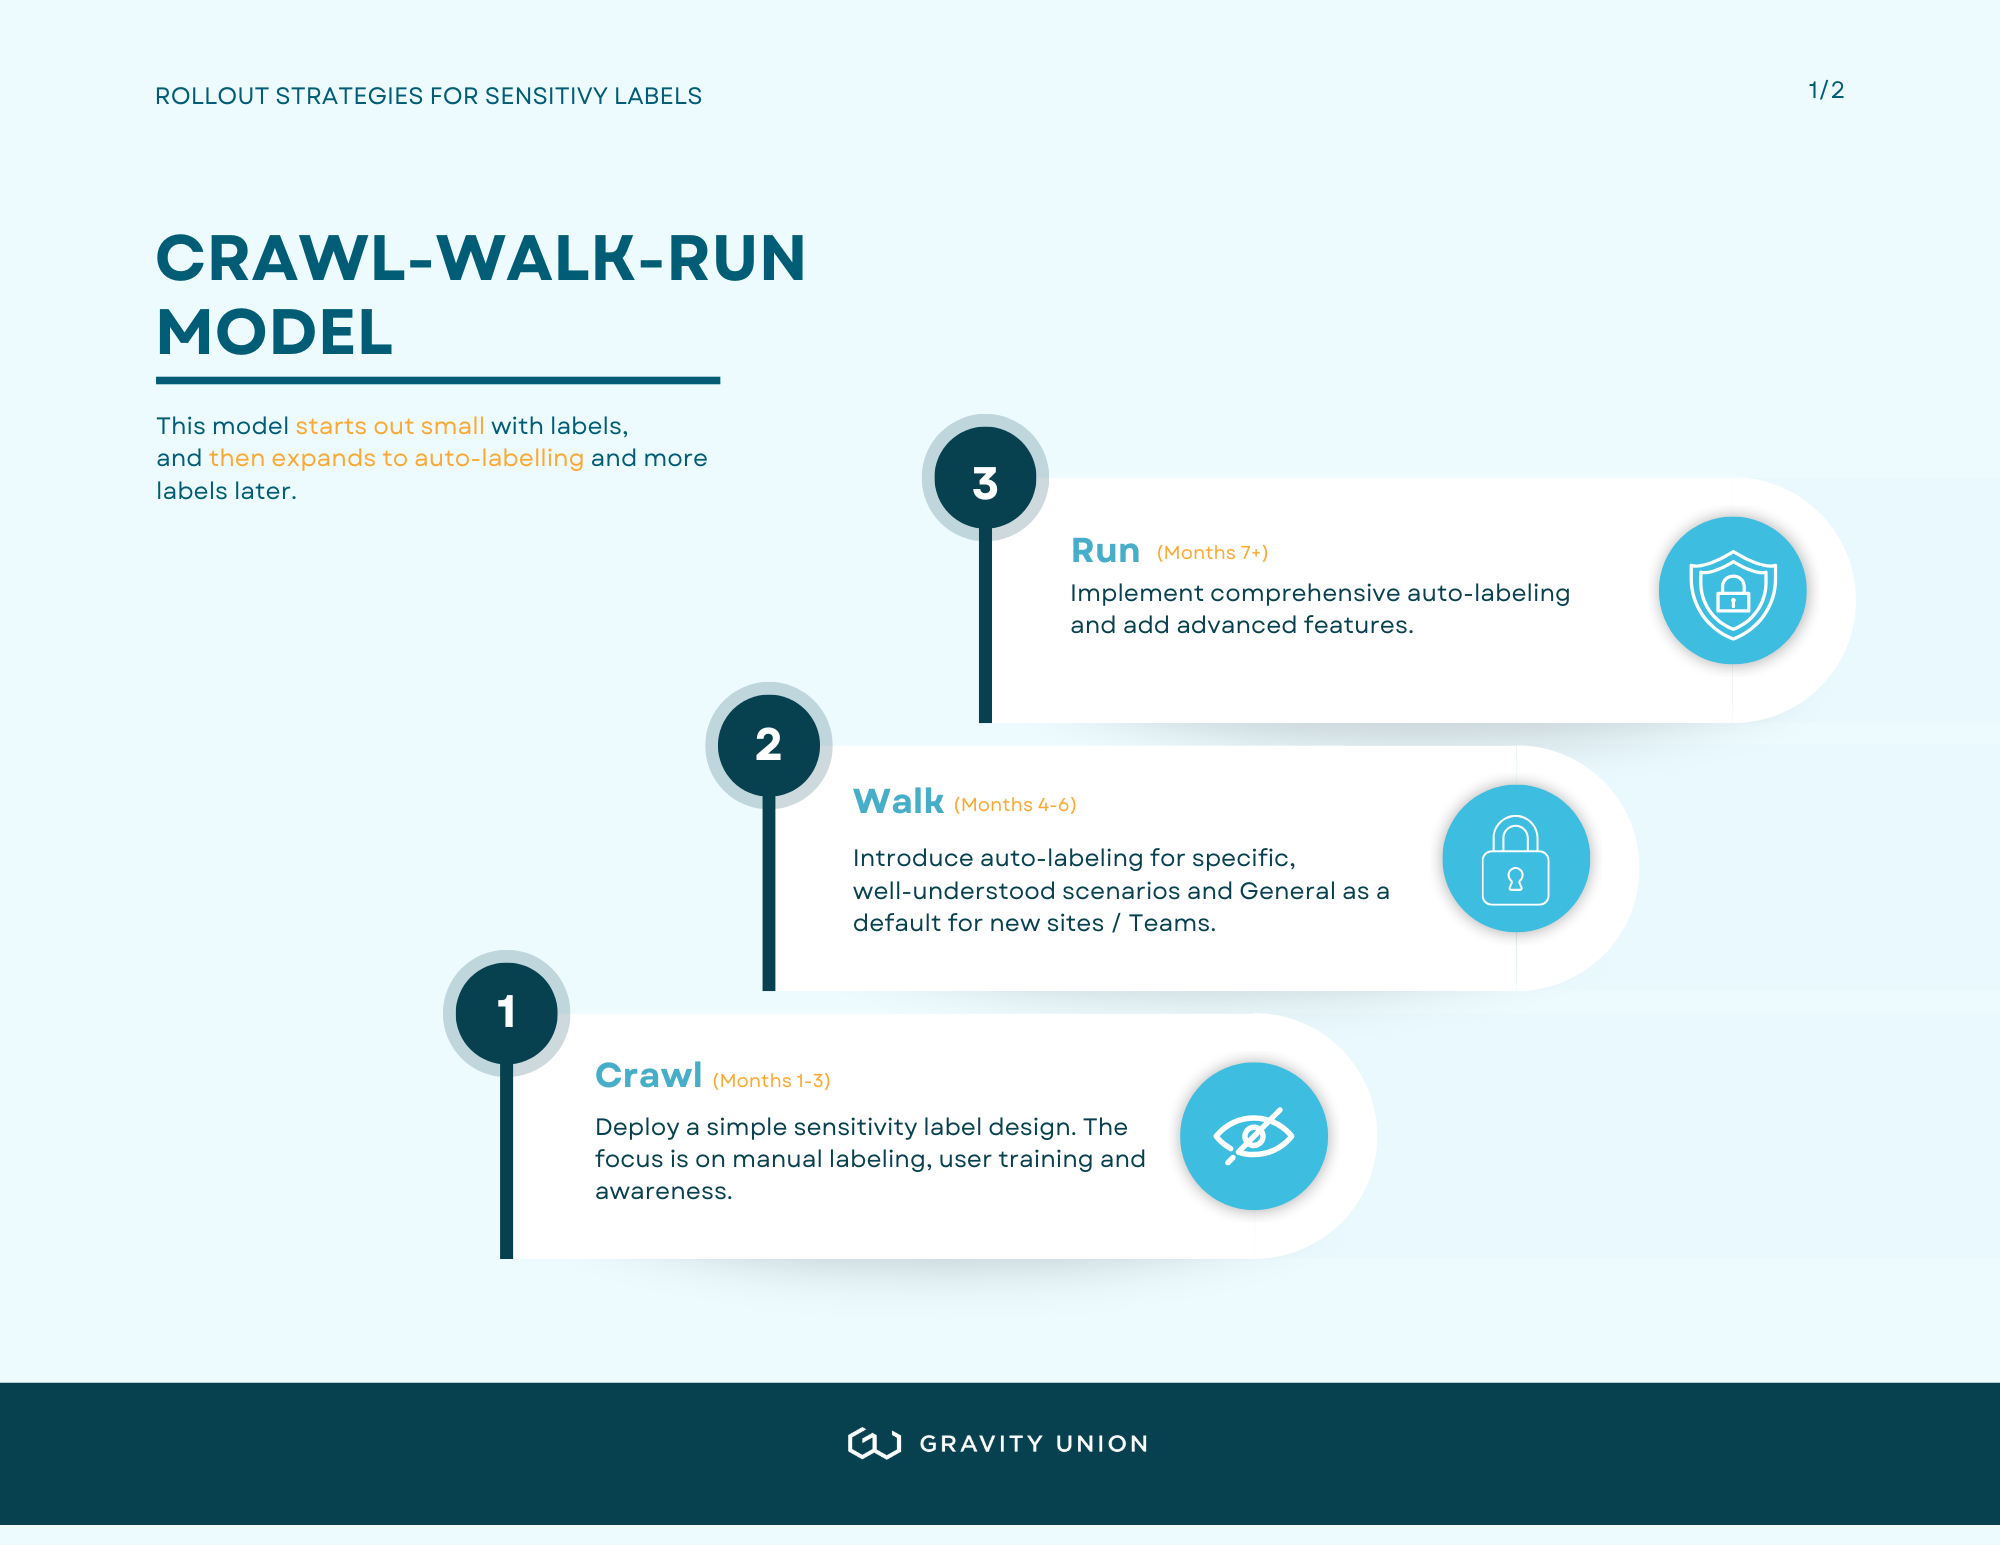
Microsoft used to recommend a rollout strategy following a traditional crawl, walk, run model which essentially starts out small with labels, and then expands to auto-labelling and more labels later.
The model looked like:
Crawl–Walk–Run model illustrating how organizations can start with manual labeling and training, then progress to targeted auto-labeling and finally to advanced, organization-wide automation.
Crawl (Months 1-3): Deploy a simple sensitivity label design, such as the three labels above with No automatic labeling or defaults yet. The focus is on manual labeling, user training and awareness.
Walk (Months 4-6): Introduce auto-labeling for specific, well-understood scenarios (financial data, HR documents, projects) and General as a default for new sites / Teams
Run (Months 7+): Implement comprehensive auto-labeling, add advanced features like custom permissions, trainable classifiers and policies to block Restricted or Highly Confidential labelled content from AI or other apps.
Why no defaults initially? Learning to consciously apply labels is crucial. Defaults can become a crutch that prevents users from understanding why labels matter.
The downside is that it forces people to manually label at the start, which we find is a deal-breaker for adoption for most organizations.
Let’s take a look at a more practical/hybrid approach which starts with some automation from Day 1.
A Practical Hybrid Approach
This approach adds defaults from the start, and allows you to test the model with targeted defaults and pilot groups. This can give you more scale at the start and helps accelerates adoption.
Licensing note: this approach requires an E5 license, or the Purview Suite add-on.
Phase 0: Planning and design foundation
Decide on a sensitivity label foundational structure (e.g. 4 or 5 labels discussed in the prior post)
Project team training on information protection fundamentals including sensitive information and privacy concepts
Align on roles and responsibilities in the organization (who is responsible for what)
Phase 1: Set Defaults and Pilot
Set “General” (or "Confidential" if you're brave!) as the default label for new sites and Teams.
Publish labels to a small pilot group such as specific users or groups like IT, Compliance or scoped to specific site(s).
Phase 1 training: the fundamentals on sensitive information & privacy and what roles in the organization are responsible for what. Focus training to Site Owners on how to apply site and library-level labels.
Change management and basic training for the rest of the organization who may come across labels from other teams
Review pilot audit reports and discover areas that potentially need sensitivity labels. Note that the Audit solution exports results into CSV for further analysis in Excel.
Phase 2: Start Auto-Labeling
Identify high-sensitivity sites (HR, Legal, Finance, Executive) and apply “Confidential” site labels – use audit reports to help with this.
Use auto-labeling policies to apply container labels to these sites.
Manually or programmatically set default document library labels to match the site label.
Reinforce Site Owner responsibilities for managing exceptions and overrides especially related to encryption.
Phase 2 training: widen audience for training on auto-labelling as it moves across the org. It would cover specifics on what each label does and how to manage exceptions.
Phase 3: Scale with more security and automation
Use Microsoft’s feature (ID 421192) to automatically inherit document library labels from site labels.
Enable service-side auto-labeling for content at rest in SharePoint and OneDrive.
If needed, deploy trainable classifiers for nuanced content types (e.g., contracts, resumes), but make sure to plan for training and testing time.
Monitor adoption using Purview’s Audit portal, Data and Activity Explorers as well as labeling insights. Set reminders to run audit searches regularly and export to maintain a full history beyond license limits.
Enforce governance with DLP policies and Conditional Access tied to label sensitivity.
Practical hybrid approach diagram showing Phases 0–3, from foundational planning and pilot defaults through to scaled auto-labeling, inheritance, and governance controls.
Key principles behind this strategy:
Derive file labels from site (container) labels to scale quickly.
Train users to manage exceptions, not protection logic.
Use automation for higher-sensitivity content, not blanket coverage.
Balance control with velocity—automation should reinforce user intent, not replace it.
Common pitfalls to avoid
Even with the best intentions, these missteps can derail your labeling strategy and frustrate users. Here’s what to watch out for:
1. Overengineering the label taxonomy
Trying to classify everything from day one—with 15+ labels—is a recipe for confusion. Users won’t know which label to choose, and admins will struggle to maintain consistency.
Start simple (e.g., Public, General, Confidential, Restricted) as we described in our last post and expand only when usage patterns justify it.
2. Blanket auto-labeling of existing content
Auto-labeling thousands of legacy documents without context or a pilot can backfire.
You’ll likely over-classify content, trigger unnecessary encryption, and frustrate users who can’t share or collaborate easily. Instead, start with high-sensitivity sites and scale gradually using service-side auto-labeling.
3. Relying on technology to replace training and education
While technology such as auto-labelling can assist, proper training and communication remain essential for employees to understand the importance of labelled documents and emails, and why using labels help reduce security and privacy risks.
4. Default labels without testing
Setting defaults for sites, Teams, libraries, and emails without piloting can lead to blind trust in the system. Users may not understand what the label means or how to change it. As described above, we recommend running a pilot first, training users and site owners, and monitoring how defaults affect behavior before rolling out broadly.
Test: Default labels don’t apply to existing files in a library, is there a way to get them to apply to historic files? Look into ShareGate / Orchestry
5. Encryption applied too broadly at the start
Encrypting all content under a broad label (e.g., Confidential) by default can break workflows. Users may be blocked from sharing externally or with colleagues, leading to workarounds like downloading and emailing files. Use encryption selectively at first, and train users on how to manage exceptions before deciding to rollout encryption more broadly.
6. Ignoring label inheritance and contextual defaults
Manually setting library labels without leveraging site-level inheritance slows deployment and increases errors. Use Microsoft’s new capability to inherit document library labels from site labels to scale securely and consistently.
Summary
Rolling out label policies doesn’t have to be complicated—we recommend avoiding common traps like creating too many labels, auto-tagging everything, or setting it and forgetting it. Start small, test your approach, and use the tools built into Microsoft to make things easier for everyone. If you’d like some practical help getting this right, the Gravity Union team is here for you.